Sunday, March 30, 2008

Tutorial: A new neck

It is time to work the neck for the Baby Boatneck sweater. The last time I made this pattern I was unhappy with the pattern directions, not because they were poorly written (quite the contrary, they were pleasantly straightforward) but because I was not thrilled with the result. According to the pattern, on a right side (RS) row you knit X stitches, bind off Y stitches, and then knit (X-1) stitches to finish off the row. Then on the next row (WS) you knit X stitches, cast on Y stitches, and then knit (X-1) stitches to finish off the row. The hole for the head appears in the middle of of the garter ridge.

This time around, I have two goals: (1) have a more solid cast-on to complete the neck shaping and (2) have the line between sweater front and sweater back lie between two garter ridges rather in the middle of one.

Here, I decided to bind off on a WS row and cast on on the following RS row to place the neck opening between two garter ridges. In order to have a more solid cast on, I will join an extra strand of the working color on the cast on row so that I can work a long-tail cast on instead of the backwards loop cast on called for by the pattern. How? Watch and see. Look here for my tutorial on knitting in ends.

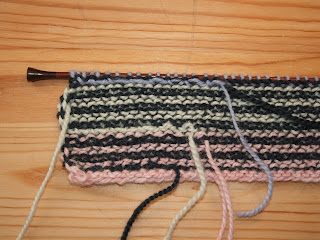
I bound off with a periwinkle stripe and now am starting a green stripe for the cast on row. In my right hand I have the working yarn and the tail end of the yarn from the other end of the ball.


In my left hand I have the yarn from the end of the ball and the tail of the now-discarded periwinkle from the previous row that need to be woven in. As I work the next X stitches (11 in my case), I knit in the purple and second green strands.

Once the 11 stitches are worked I have two strands of green waiting for me at the left side of the right hand needle:


See the back:
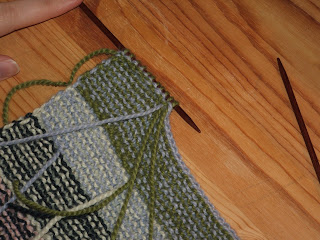


Now, since I have two strands of green at my disposal, I can work a long-tail cast on for Y stitches as called for by the pattern (38 in my case).


The long-tail cast on is the equivalent of a backwards loop cast on followed by a row of knitting. It is that extra stitch (or rather its equivalent in the long-tail cast on) that makes the cast on more secure.


Once I have cast on my Y stitches, I knit in the extra strand (the one from the outside of the green ball) across the last (X-1) stitches of the row. See the tail where I have cut off the extra:


I work the next row across in the green to finish off the neck (technically it was done at the end of the last row) by knitting across the side stitches and the new cast on stitches for the other side of the neck.


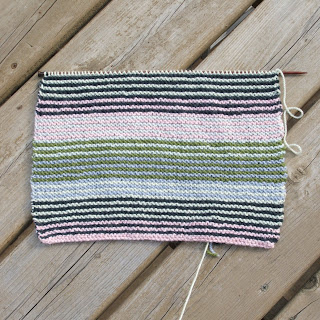
Now all I have to do is keep working the stripes in pattern until the two sides of the neck opening are the same length. The tricky part is done. See: a neck.

Wednesday, March 26, 2008

On my desk

I often knit while I read, especially if I am lucky enough to have a book that will lie open by itself. This little habit is especially useful in helping me get my work-related reading done since I find that if my hands are fidgeting my brain does not need to and the reading goes much more quickly. These projects usually have a simple stitch pattern that I do not need to look at while I work. Stockinette, garter, and simple patterns with short repeats are usually designated "reading projects."

So, what do I have on my desk at the moment? The second incarnation of the Baby Boatneck (ravelry link) grows steadily.


If you look closely you can see that the stripe color following the navy blue differs from what I posted a few days ago in the tutorial. Originally I had chosen periwinkle to follow navy but changed the colors around after I started knitting and saw how the alternating stripes were going to work together. However, that did not keep me from trying to start periwinkle after the navy whenever I got the chance. It was not until I started choosing pictures for the tutorial that I noticed my mistake so I got to spend the upload time frogging back to the end of the navy section.

What is even more embarrassing is that I did the exact same thing after I finished the first pattern repeat and started the second last night. There I had knit a good three or four garter ridges before I realized my mistake. Needless to say, I have been doing enough frogging lately to earn this blog name.

Moving on to less embarrassing knitting news, I also have a new husband sock on my desk. Plain stockinette in trekking color 185. It looks rather like blue jeans, I think.


Yes, I know that a pattern would be lovely, especially when I am lucky enough to have a husband who appreciates such things. That said, the stockinette will hopefully be done within the month and after all of the guilt that he has given me over not having any new hand-knit socks I am sure he would prefer simple socks now to interesting ones at some indefinite future date.

Saturday, March 22, 2008

Tutorial: Knitting in Ends

I do not particularly care for weaving in 5 billion ends when I finish a project, especially when that project involves multiple colors of yarn that come in and out for short periods and leave ends right and left. So, in order to avoid some hassle and unladylike language when I have finished the knitting I try to cheat a bit. knitting in the ends as I go works pretty well in garter stitch because the texture of the stitch hides the bit of extra bulk that goes along with the technique. That bulk usually keeps me from knitting in ends when I work stockinette stitch because the extra yarn is much more apparent. There I prefer spit-splicing but that is for another day.

On with the tutorial. I am working on the Cozy Boatneck Sweater from Itty-Bitty Nursery. The pattern involves stripes of garter ridges and there are plenty of ends to deal with as the colors change.

I usually start this technique 2 stitches in from the edge in order to avoid too many tension problems at the edge of the piece. Start by knitting the first two stitches of the new row. In my right hand I have the working yarn and in my left I have the ends that I want to weave in:


Here I am weaving in two ends at once, the end tail of a color that I am finished with (navy) and the beginning piece of the light purple that I am joining.


I like to hold the ends between the middle and ring fingers of my left hand to maintain tension while I knit.


Insert the right needle into the next stitch on the left needle as if to knit. Then, using your left hand, bring the ends around the back of the right needle tip and up over the needle.


Now hold the ends down and out of the way below the needle and bring the working yarn around the right needle tip as you would to knit.


Using your left hand, bring the ends back up over the right needle tip so that they cross over the working yarn behind the right needle.


Here you reverse the motion that you used to wrap the ends up above. There you wrapped from right to left around the needle and here you unwrap from left to right.

Now bring the newly knitted stitch through the loop on the left and off the left needle, just like if you were knitting regularly. The ends are held safely in the back of the work with your left hand.


The next stitch is easy - just hold the ends out of the way with your left hand and knit the next stitch.


Repeat this two-stitch pattern [wrap 1, knit 1] four or five times to secure the ends. You can always wrap more but I would not want to do less than this for fear of the yarn coming out after the garment has been worn. When you are done wrapping, just drop the ends and continue knitting.

This is what the back looks like. You can see that the ends are caught in the back of the loops that go over the needle to make the knit stitches.


When you are done with the piece, block it if you are so inclined and then trim the ends flush with the back of the fabric. It is a great feeling knowing that you only have to trim those ends instead of having to weave them in.

Thursday, March 20, 2008

Color envy

My spinning wheel and I became reacquainted this week. I love spinning and I especially love the progress that I have been making as I learn more about how to use my wheel and the different fibers in my stash. However, if I only have a few minutes of spare time I am much more likely to pick up my knitting than to sit down at the wheel.

Part of the problem lately has been color envy. I think it hit me when I had wandered over to look at Brooklyntweed's spinning photoset. All those beautiful colors and what was I spinning? White. Plain white blue face leicester. Now this is some lovely stuff, to be fair. A beautifully prepared top that I picked up from The Fold about a year ago.


Yesterday the color envy hit especially hard. My bobbin was about two-thirds full but I just could not stay away from the color in my spinning stash any longer. Of course, I justified stopping by telling myself that I had not navajo-plied anything in quite a while and maybe the plied yarn would overflow the bobbin if I spun anymore of the single. Who was I kidding? So I ended up with this:


About 93 yards of fingering weight BFL three-ply. I am quite taken with it, even if I do not have the slightest clue what to use it for. In all likelihood it will sit in the stash until I get back to spinning up the rest of that big ball from The Fold.

Can you blame me when this is in the stash?


The baby camel/ tussah silk blend (top photo) now sits happily on the wheel.